HOW TO REPROGRAM YOUR 2009 CRF450R FUEL INJECTION SYSTEM IN TEN EASY STEPS; They Are Easy If You Are Good At “Masters Of Warcraft”
IT’S EASY IF YOU ARE A 15-YEAR-OLD GAMER
The MXA wrecking crew has lots of experience reprogramming the ECU on the fuel-injected CRF450. As we fiddled with the ignition timing and fuel flow, we constantly had to remind ourselves that the bike wasn’t a toy. Without proper respect, you could use the setting tool to really mess up your bike. Here are MXA‘s ten steps to reprogramming the ECU on your Honda CRF450.
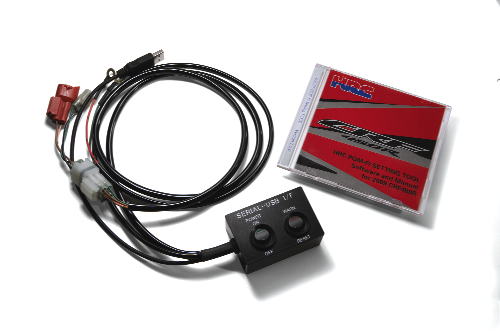
(1) Tools. Be sure you have the proper equipment. In addition to Honda’s PGM-FI Setting Tool kit, you’ll need an IBM AT compatible PC (Windows SE/2000/XP/Vista) and a free USB port to communicate with the ECU. Honda’s PGM-FI comes with a CD-ROM to download the software and driver to your computer. Although a desktop would technically work, it is best to use a laptop so that you can make track-side adjustments. You will also need a 12-volt motorcycle battery to energize the system and to write the new data to the ECU.
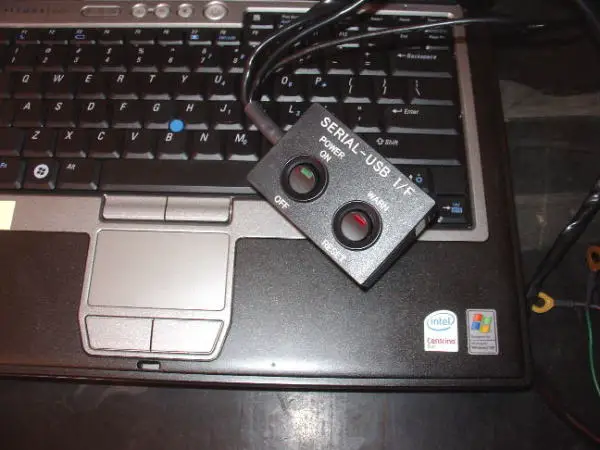
A laptop is mandatory for track-side changes.
Battery not included.
(3) Open the program. Once installation is complete, you can open the program and figure out the mapping you want to try before you bother connecting your computer to the bike. The first time you open the program, you will access the stock mapping from the file called “C:Program files9CRF450R9CRF450.E2P.” In function, you will modify these stock settings and save them under a different name, keeping the standard settings to fall back on. To be sure the program can communicate through the driver, find the driver under the device manager in the control panel and determine what port it’s installed to, for example, comm4. Return to the program and select that “CommPort.”
(4) Map reading. The Honda CRF450 PGM-FI Setting Tool allows you to precisely fine tune both ignition timing and air/fuel mixture ratio mapping. With the program open, the “Data Edit” menu in the upper left gives you three options for viewing fuel mapping (Fi) and three more very similar options for ignition mapping (IG). Be careful not to confuse the two. Adjustments can be made on “graph mode” or the “number of percent” mode, while the “3D graph” mode allows you to visualize your changes. In “number of percent” mode, the precise throttle position and rpm at which you are making an adjustment can be fine tuned. (We made changes to the ignition map at 2500 rpm at 15 percent throttle.) The “graph mode” will reflect any changes when you want to see your adjustments at each throttle position respectively.
(5) Choices. How much of a change should you make? The sky’s the limit, but we recommend only advancing or retarding the ignition one degree in any given field to begin with. If you feel the change is too much or not enough, narrow or broaden the throttle and rpm range at which you make the change before you advance or retard the ignition further. As for fuel mapping changes, there is a translation index to go from jetting to mapping: one jet is approximately equal to three percent. Jets roughly translate to throttle openings as follows: 0-25 percent is the pilot jet, 25-70 percent is the needle, 70-100 percent is the mainjet. Use your old-school carburetion experience to help get you started in visualizing and making fuel adjustments, but don’t let it confine you. This system is far more precise and advanced. On a standard bike, a one to two percent mixture ratio adjustment is plenty.
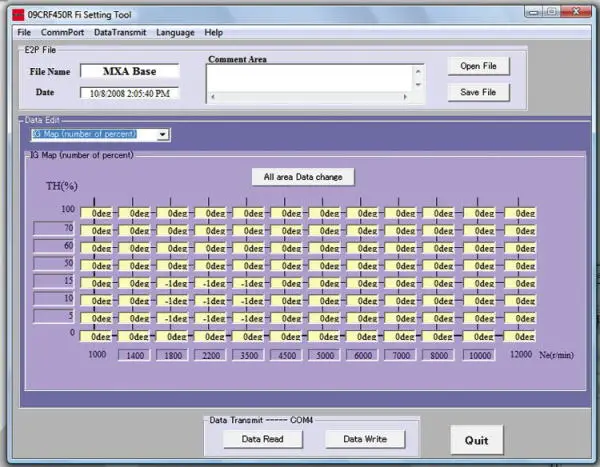
We made the most adjustments in the “IG” Map (number of percent)” mode.
(6) Focused changes. What should you adjust? Ignition mapping adjustments are more effective on the stock ’09 CRF than fuel mapping adjustments. In MXA‘s multiple mapping endeavors, our goals were to mellow out the initial power delivery of the ultra-responsive CRF and to lessen the flat-as-a-board feeling on top-end power. After about ten different maps, we were very successful in eliminating the jerky hit off the bottom that test riders didn’t like, but could never make any significant power gains from 8000 rpm up. Don’t get us wrong; with the PGM-FI tool we could change the powerband, but the changes weren’t earth-shattering. We did succeed in getting rid of the irritating bark off idle by retarding the ignition one degree (-1) at five percent, ten percents and 15 percent throttle openings in the 1800 to 3500 RPM range. The benefits of fuel mapping adjustments are minimal until significant engine modifications, exhaust pipes, etc., change the need for fuel delivery.
(7) Changing the map. Once you have designed your new map on the computer screen, you need to put it into the bike’s ECU. To connect to the bike, find the red connector under the seat. It is easily accessible and isn’t connected to anything as the bike sits normally. The next connector, the “clear one,” plugs into the fuel pump wiring harness. Unfortunately, you must remove the gas tank to access this connector (which is connected to the bike and must be disconnected in order to connect to Honda’s Serial Interface Unit.) Prepare the bike by exposing these connectors. Every time we changed the maps we had to remove the seat, radiator shrouds and gas tank. The gas tank hangs from a tether, but it’s best to tie a knot in the gas cap’s vent hose to prevent fuel leakage.

The red plug is easily accessible. The clear plug is under the fuel tank on the 2009 model, but will be accessible on the 2010.
(8) Making a connection. To connect your computer to the bike, first connect the Serial Interface Unit to your computer using the USB cable. Next, connect the red and clear plugs on the Serial Interface Unit to their mates on the bike. Lastly, connect the Serial Interface Unit’s battery eyelets to your 12 volt battery. Be sure the file you want to use is open. Now you are ready to turn the power switch on the Serial Interface Unit to “ON.” Once you are ready, click “Data Write” on your computer. Note: The “Warn” switch is not used with the CRF450R and its position doesn’t matter.
(9) Dialogue boxes. Dialogue boxes with menus will pop up. Click “OK” as they appear. It should only take a few seconds to write the data. When completed, turn the Serial Interface Unit’s power switch to “OFF” and disconnect the cables from the bike. Note: be sure to reconnect the fuel pump’s clear plug.

To write the data, a battery is required to energize the system.
(10) Addendums. Here are some important things to know. Although the program will allow much greater adjustment, the manufacturer recommends only advancing or retarding the ignition four degrees up to 4900 rpm and two degrees above 5000. The recommendation for fuel/air mixture ratio is plus or minus seven percent.
The first hundred units of the 2009 CRF450R PGM-FI Setting Tool may give the user a communication error the very first time he connects it to his bike. The error message reads “The ECU cannot be shifted to the data Transmission mode.” If this error occurs, follow these steps carefully:
(1) Turn the Serial-USB I/F unit power switch off.
You can also retrieve the curve off another CRF450R by hooking the PGM-FI unit up to the loaner bike and clicking “Data Read” to retrieve the ECU’s current setting data.
What Do We think? With the exception of a map where we retarded the ignition at very low rpm settings to take some of the bark out of the bottom, we never really found a map (and we tried a lot of them…and HRC sent us some extra ones) that we thought was an overall improvement. We could change the powerband, but never make it better overall. And, we could never get more power above 8500 rpm (which is where we wanted it). The best to improve the power on the 2009 CRF450 is with an exhaust system. A pipe can move the peak power up by as much a 1000 rpm.


Comments are closed.